Water Heater Drain Valve 101
Last Updated: 11 June 2024
***DISCLAIMER: PLEASE REFER TO YOUR MANUFACTURER’S INSTALLATION MANUAL FOR INFORMATION REGARDING YOUR SPECIFIC MODEL. IF YOU ARE ATTEMPTING TO SERVICE YOUR OWN HEATER, PLEASE DO SO WITH CAUTION; U.S. WATER HEATING SOLUTIONS, LLC. AND THE OTHER ORGANIZATIONS MENTIONED BELOW ARE NOT RESPONSIBLE FOR ASSOCIATED LIABILITIES. THIS ARTICLE IS MEANT TO PROVIDE AN INFORMATIVE AND EDUCATIONAL SUMMARY AND DOES NOT SUPERSEDE OFFICIAL WATER HEATER REPAIRS OR MANUFACTURER INFORMATION.
What is a Water Heater Drain Valve?
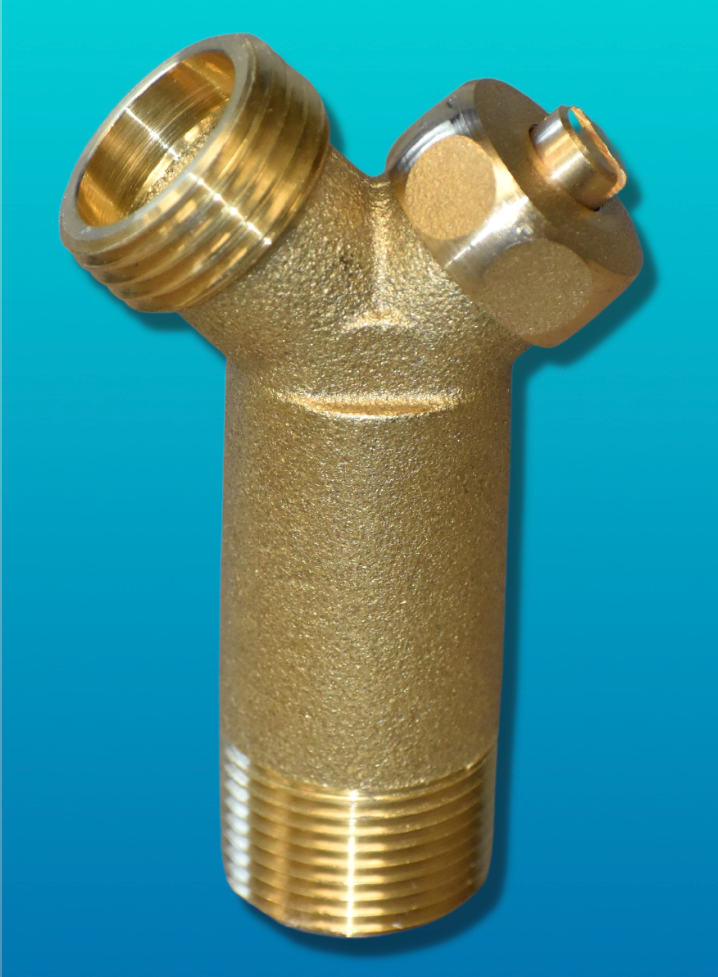
The drain valve is a valve with two openings and threaded ends that typically comes pre-installed on your water heater. The purpose of the drain valve is to help you or a service tech connect a hose to the water heater to drain the tank for service or preventative maintenance.
How long does a drain valve last?
A water heater’s drain valve should last the entire duration of the unit’s life; in other words, drain valves are one of the less commonly replaced parts on a water heater.
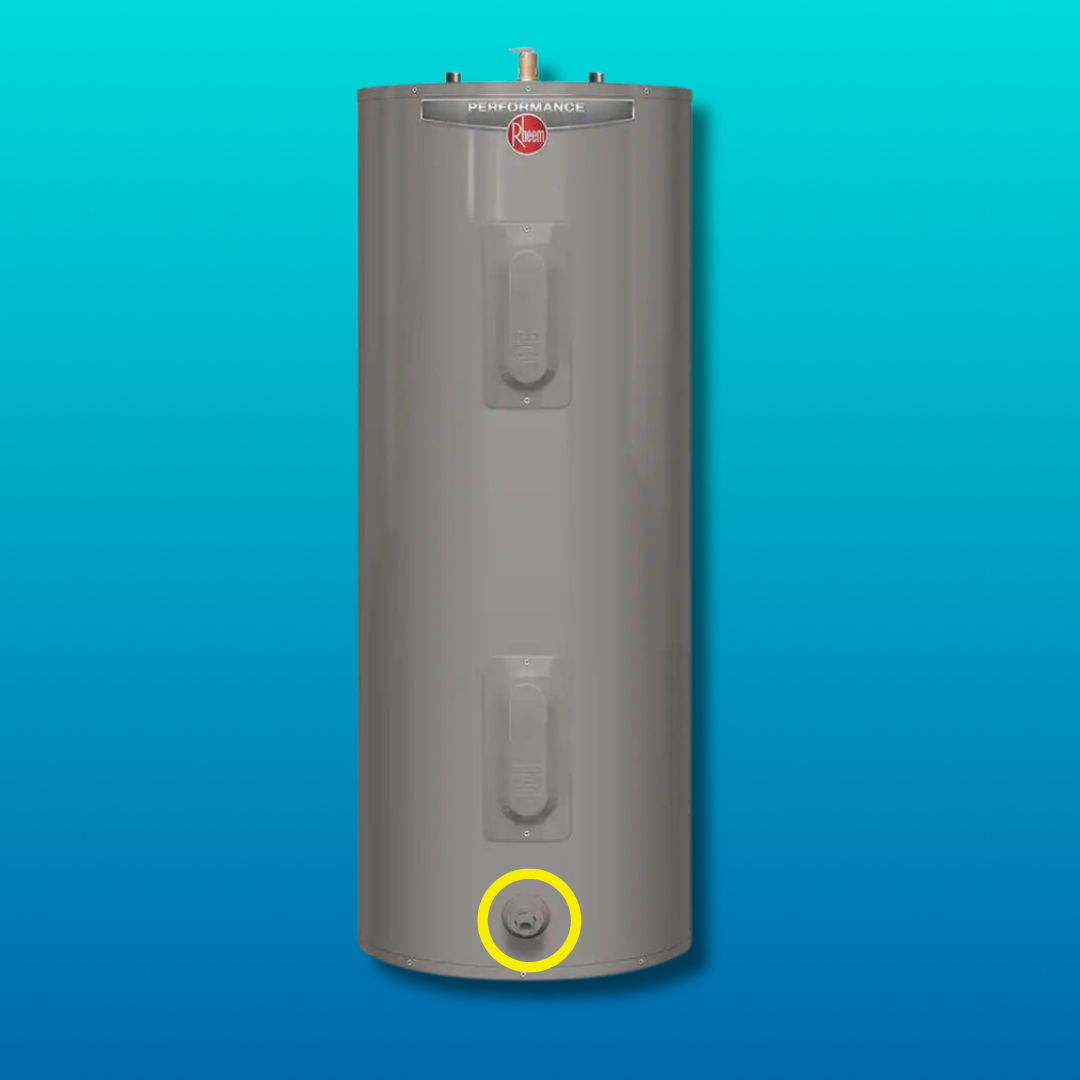
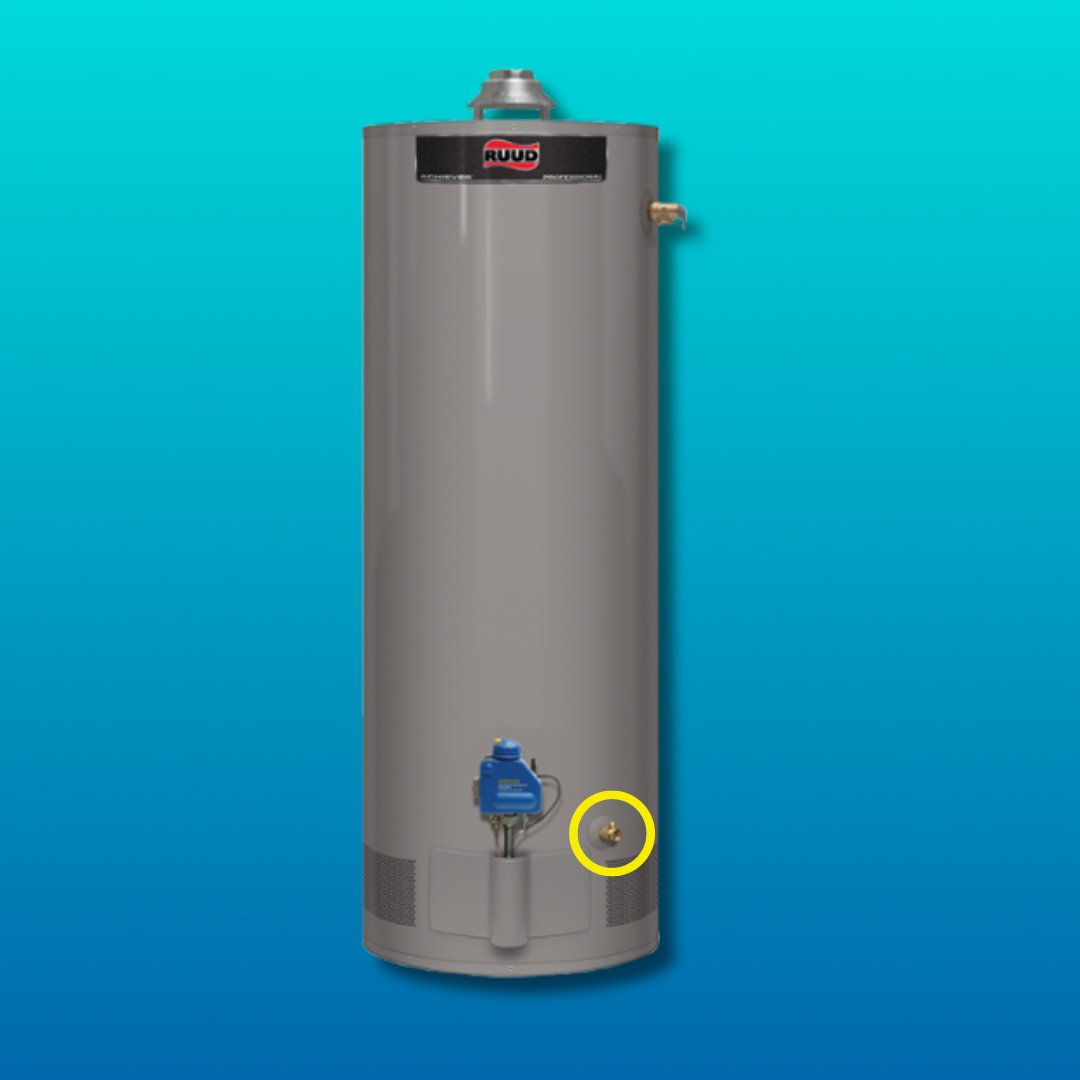
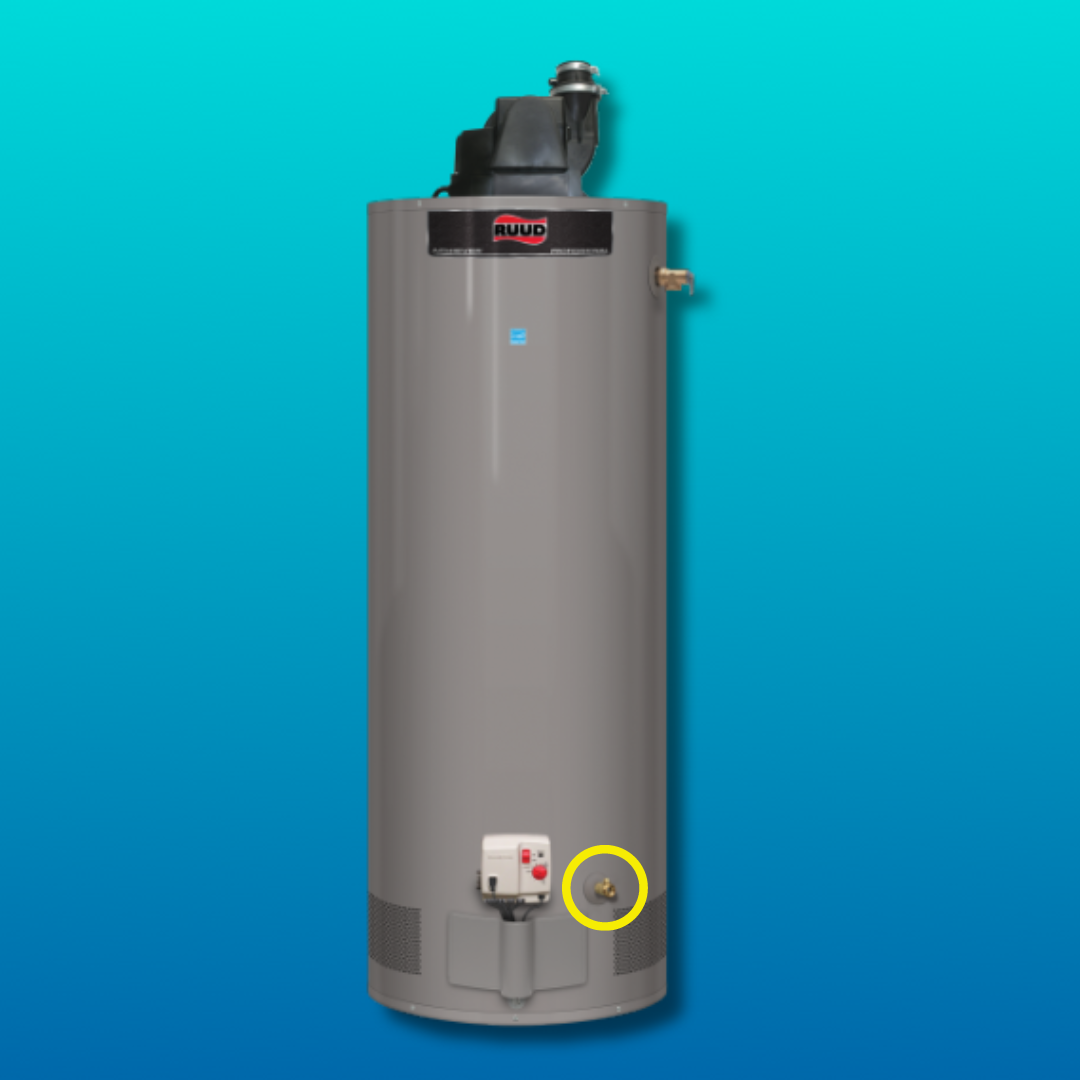
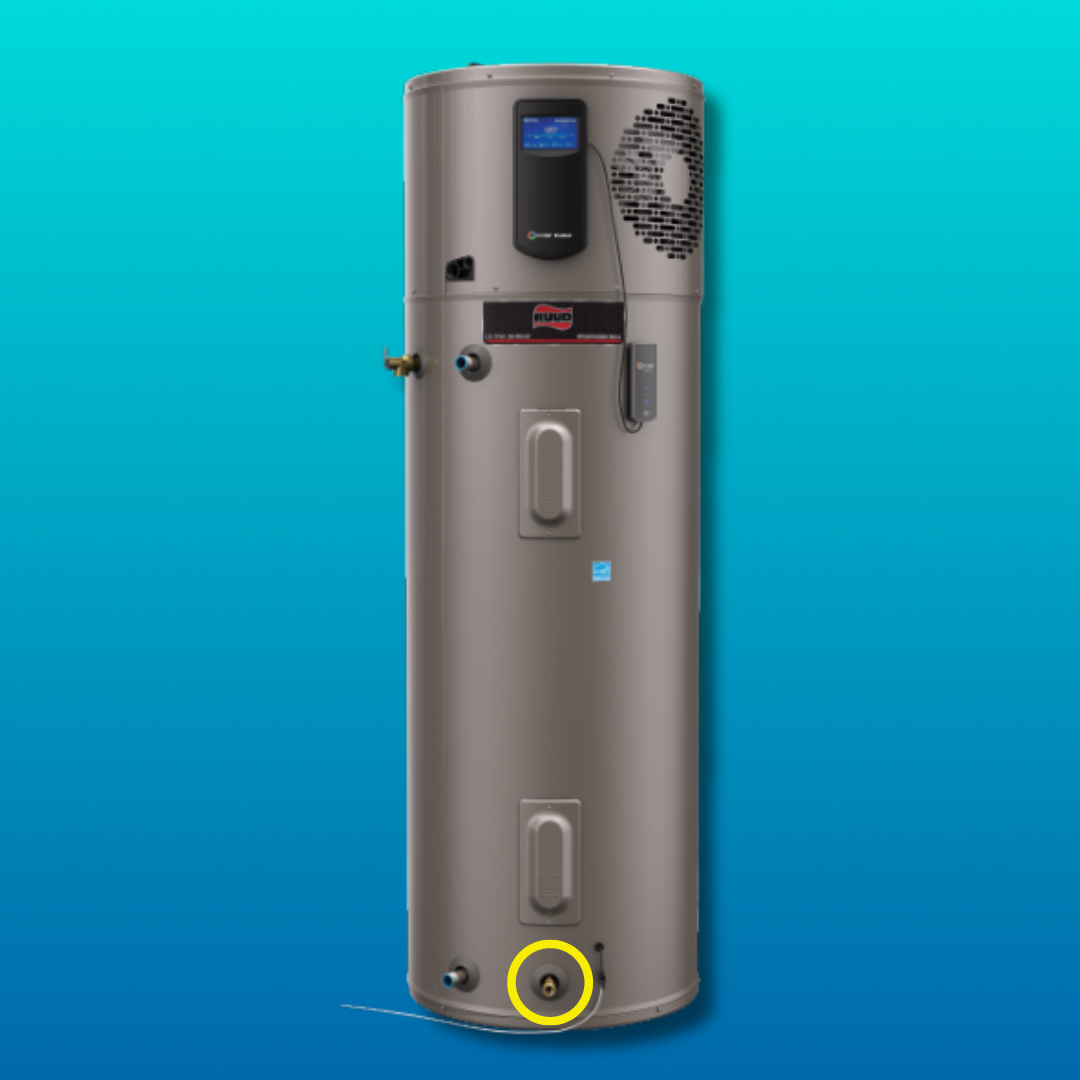
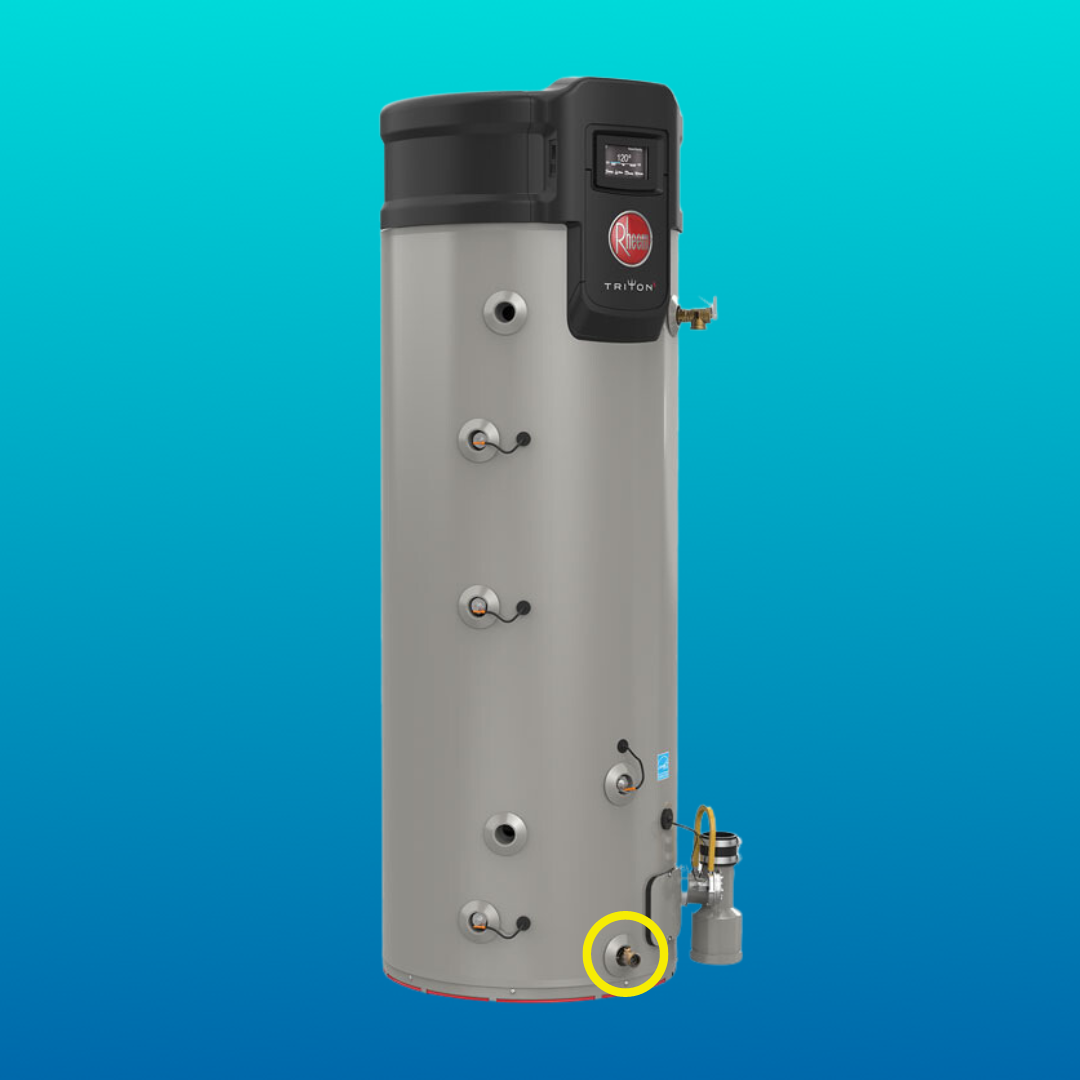
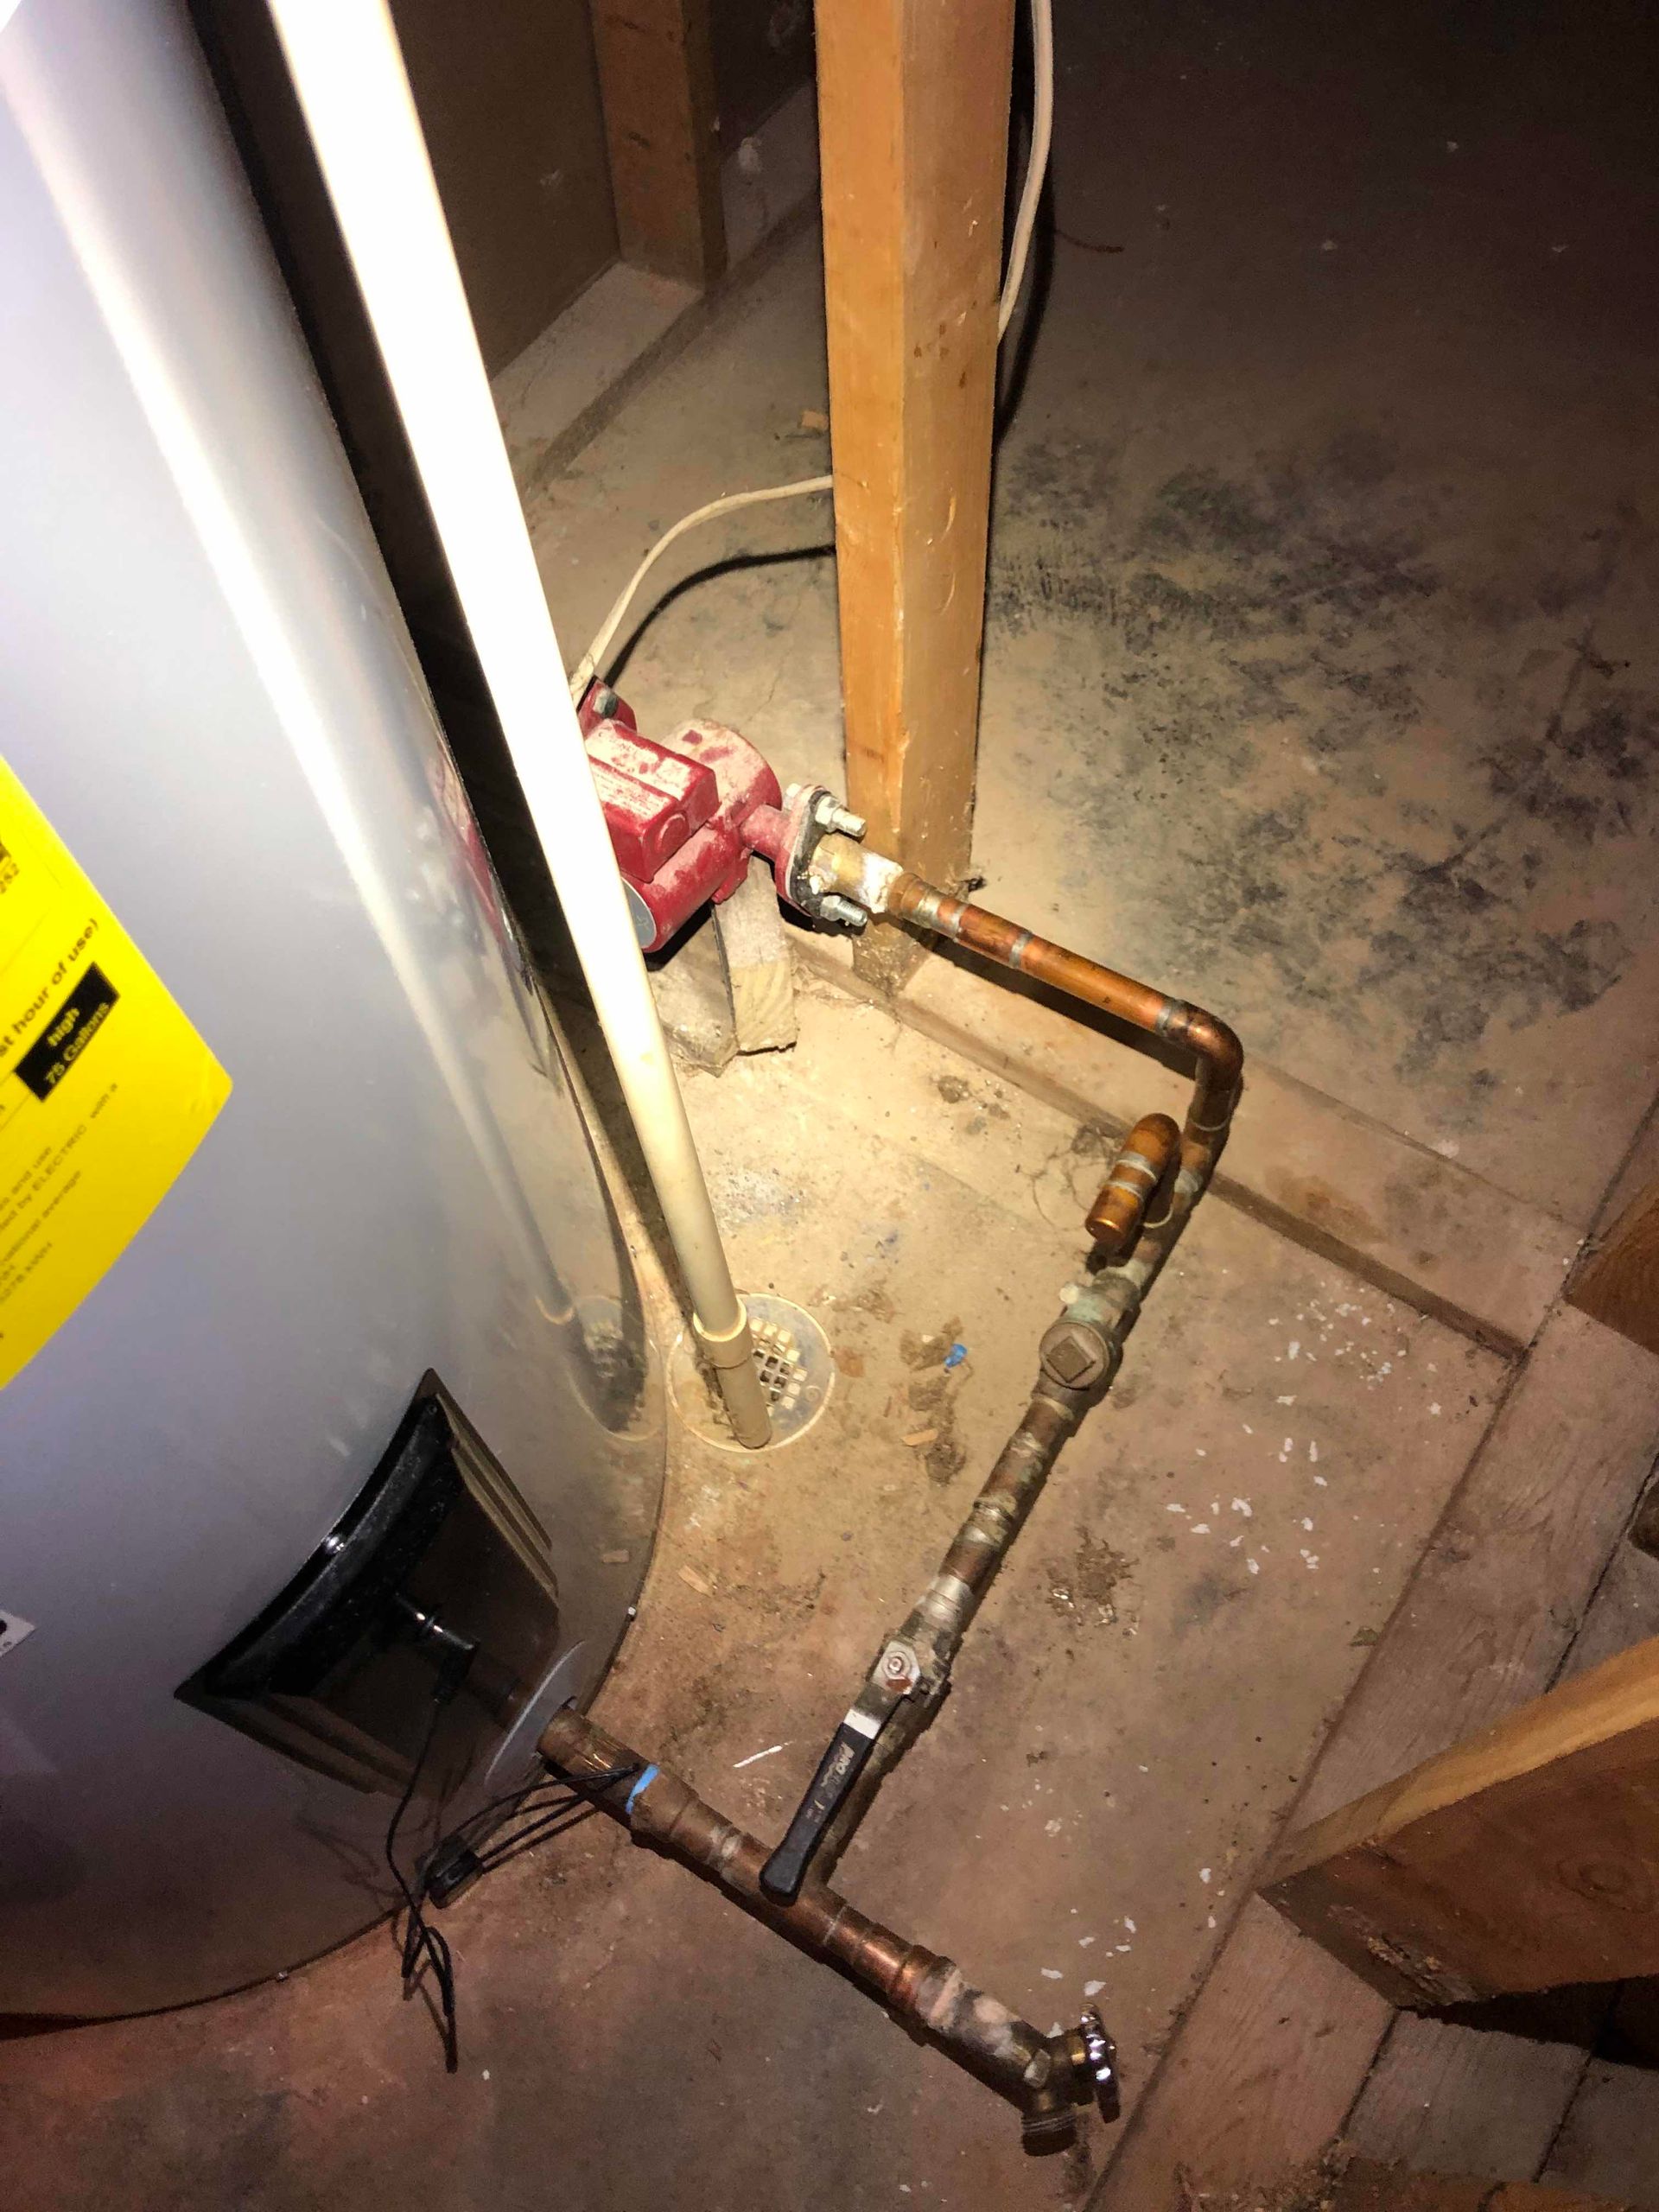
Where is the drain valve located on a water heater?
Drain valves are located near the bottom of your water heater; depending on the model they may be near the center or slightly more towards the right side of the unit. Residential heat pump water heaters’ drain valves are typically centered on the heater, while gas and electric water heaters’ drain valves are typically off to the right or left.
Drain valves are only found on commercial and residential tank type water heaters and storage tanks. Tankless water heaters do NOT have a separate/dedicated drain valve because they do not store massive amounts of water like a traditional tank type water heater. Instead, tankless units are typically installed with isolation valves or service valves that have built-in purge drains or a threaded end where you can connect hoses to flush the tankless water heater.
What are the Different Types of Water Heater Drain Valves?

There are three main types of materials for drain valves found on residential tank type water heaters:
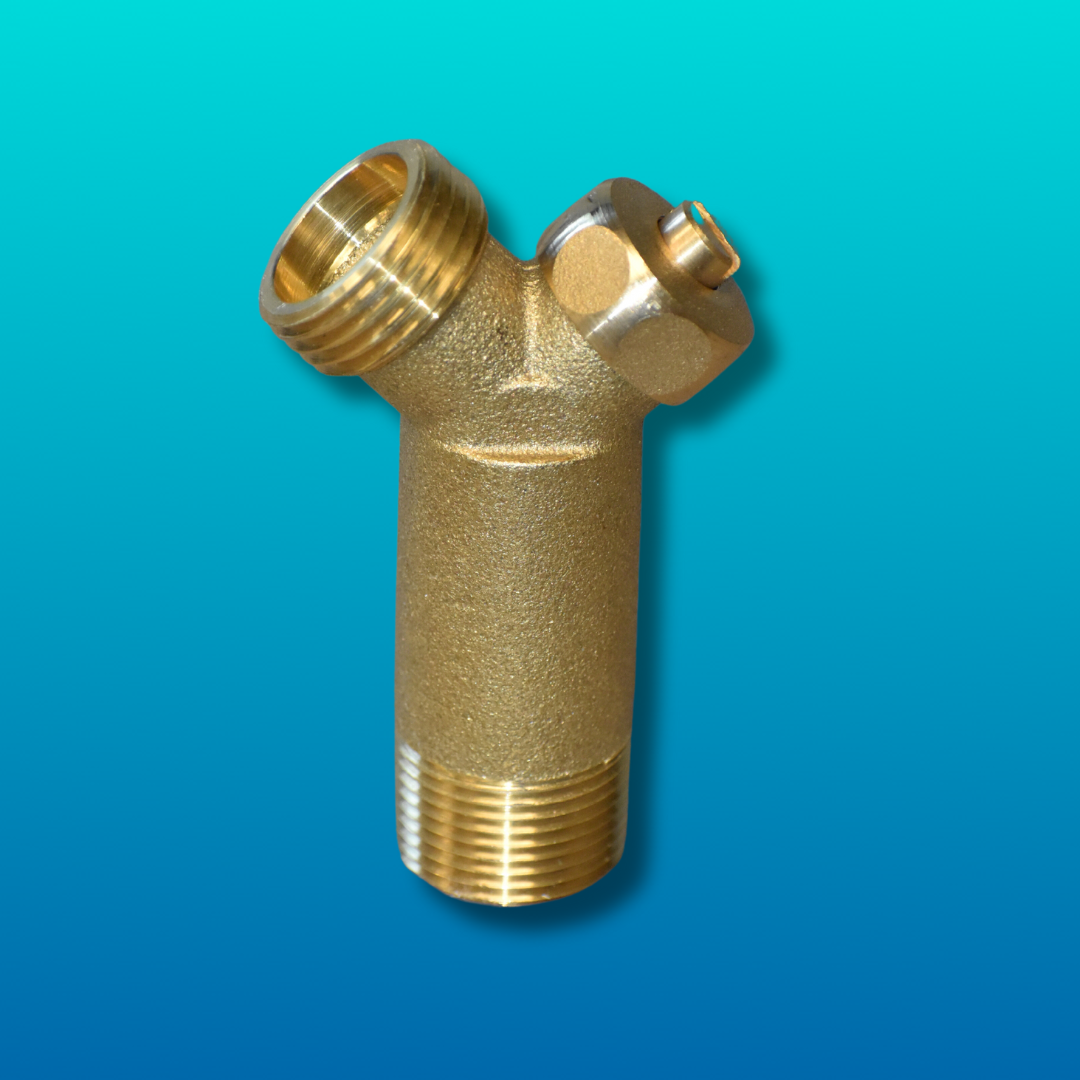
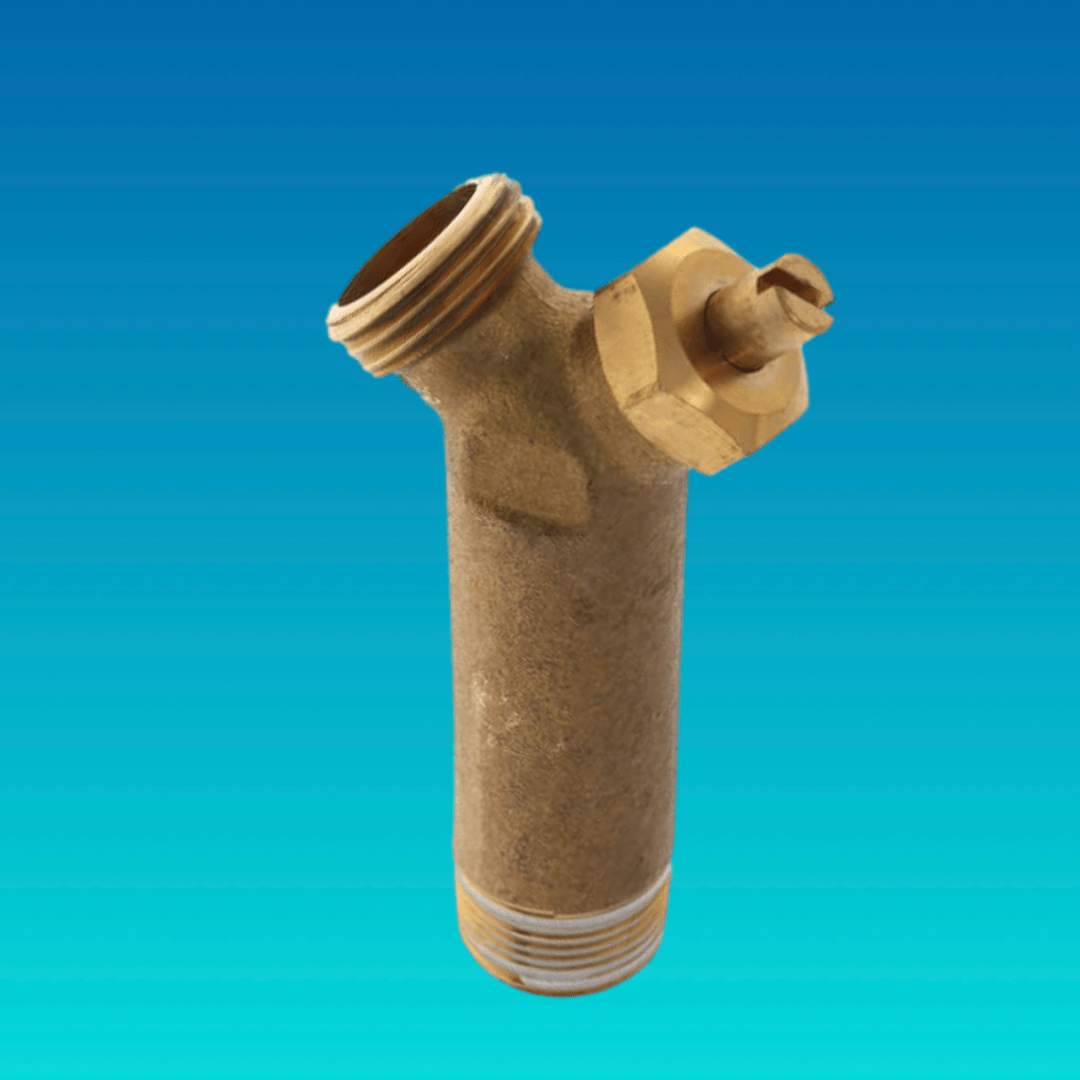
1. Brass Drain Valve
These are most commonly found on “proline” water heaters or a manufacturer’s product line that is sold exclusively to supply houses, although they are becoming more popular; we recommend ensuring your unit has this type of drain valve or a ball valve.
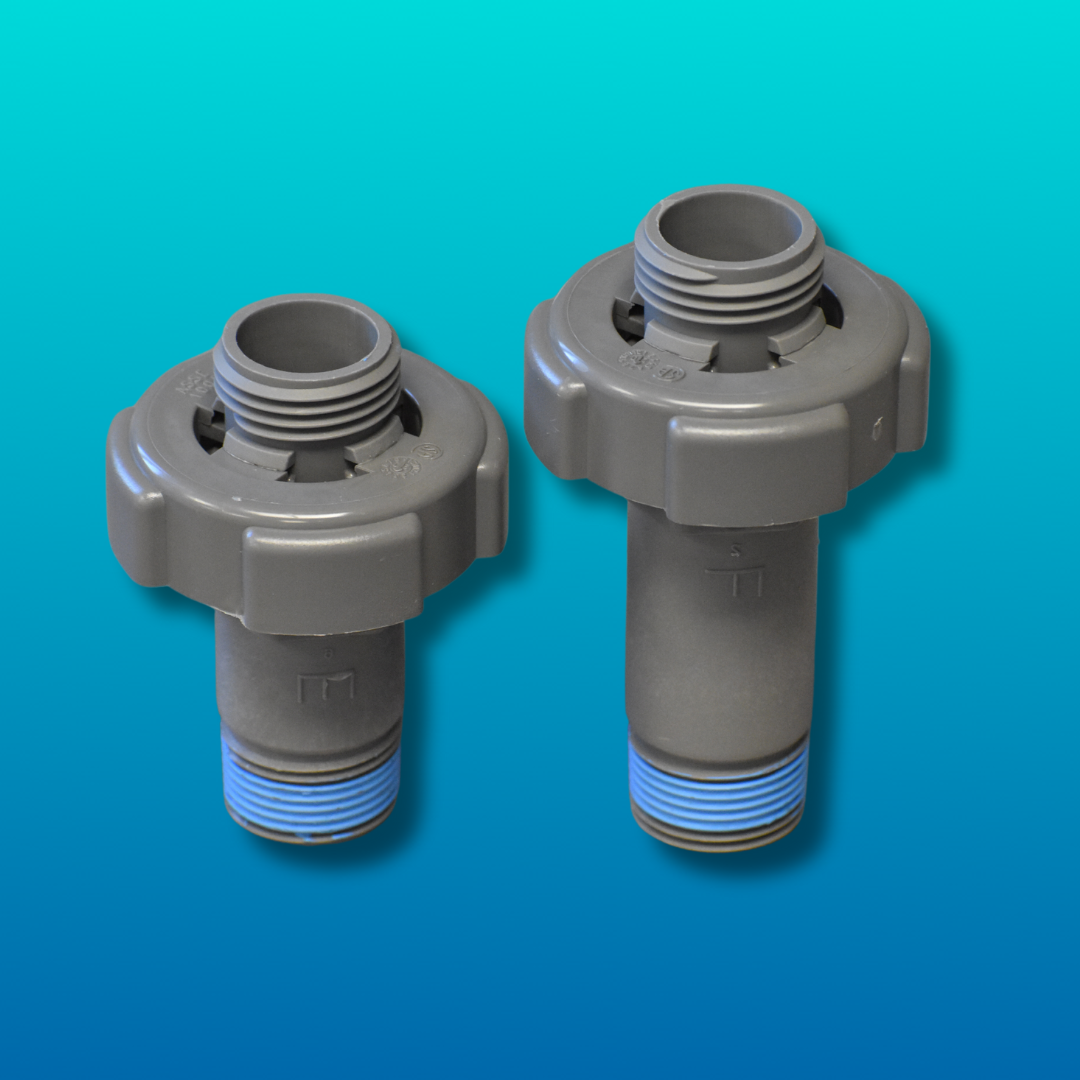
2. Plastic Drain Valve
These are the least expensive drain valves and often experience the most issues; they are most commonly found on water heaters purchased at hardware stores
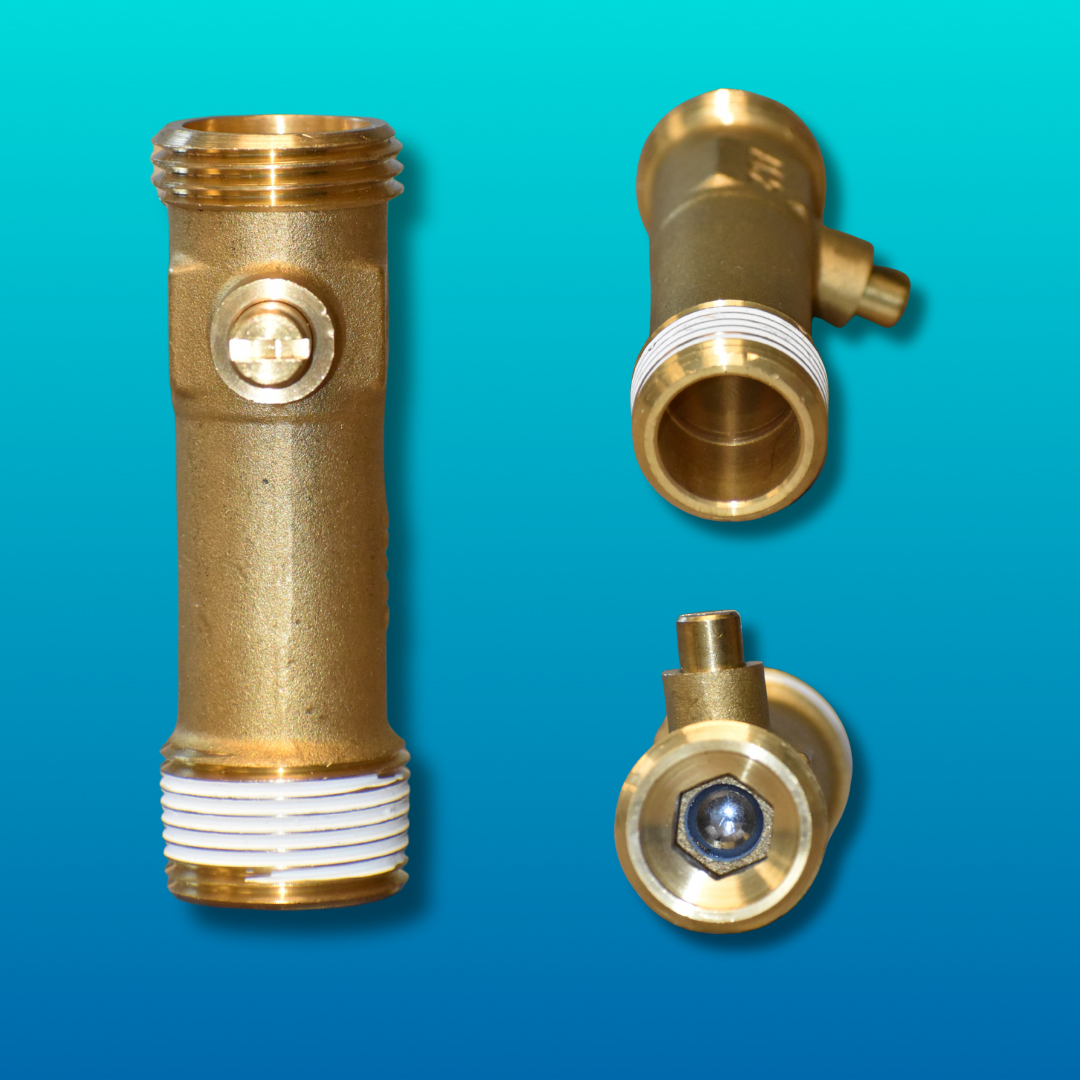
3. Full Port Ball Valve Drain Valve
In our opinion, these are among the best drain valves because they are the easiest to use and allow greater control of the water; however, they are also the most expensive and depending on the terms of your warranty, could void your warranty.
Are Drain Valves Interchangeable?
Bottom Line: Yes, you can upgrade from a plastic drain valve to a brass drain valve, regardless of the brand; but, it is important to match the diameter and the length.
Some Things to Keep in Mind:
- Not all drain valves are interchangeable. There are different diameters and lengths for different models of water heaters. A 75-gallon water heater will have a longer drain valve with a wider diameter than a 40 or 50-gallon water heater, for example. Most 40-gallon and 50-gallon residential water heater drain valves have a ¾” diameter.
- It is also important to
check your
warranty paperwork
or call the manufacturer's tech support line
prior
to making any changes/upgrades to your drain valve, beyond like-for-like replacement. We'll explain why in the next section.
How a Drain Valve and a Recirculation Pump Voided a Customer's Warranty
One customer had a residential electric water heater with a recirculation pump installed. The purpose of the recirculation pump was to lead the “recycled” or recirculated hot water back into a line with a tee that was connected to a brass drain valve.
The customer was having issues with their unit for several months and we were called out to diagnose and repair the water heater. Ultimately, the manufacturer voided the customer’s warranty until they provided photographic proof that they reinstalled the original plastic drain valve.
Why did this happen? This happened because according to the manufacturer’s warranty specifications, using anything other than the original factory drain valve and the piping from the recirculation line were classified as an alteration or form of tampering with the unit: “the water heater is not installed, operated and maintained in accordance with the printed Manufacturer’s instructions, including if the water heater has any additional aftermarket equipment introduced into the sealed system not approved by the manufacturer […].” Then, the recirculation pump being tied back into the water heater from the drain valve caused additional problems from the perspective of the manufacturer’s warranty because the system was continuously cycling warm or hot water back into the bottom of the unit where the cold water is sent to be heated.
The problem: the constant influx of warm/hot water at the bottom of the tank can cause erratic temperature fluctuations for the
element and t-stat; in the case of a gas water heater, this type of recirculation line connected to the drain valve port would affect the
gas valve’s shank/temperature sensor.
Common Drain Valve Issues + When You Need to Replace Your Drain Valve
1. Damage During Shipping or Service: Plastic drain valves are especially susceptible to damage when a water heater is shipped or transported. They may also be damaged if they are hit by a heavy object like a mop bucket filled with water. As a result, they may crack or break off, causing a leak. In some rare cases, when replacing a plastic drain valve or connecting it to a hose with metal fittings, the threading can become stripped, causing a leak.
2. Drain Valve Partially Open: After draining or servicing the unit, it is possible that a drain valve may appear to be leaking because it is not fully closed.
3. Sediment Build-up: Excess sediment build-up caused by minerals in your water tend to gather at the bottom of the tank; subsequently, the drain valve is also located at the bottom of the heater and can become encumbered by the sediment. If you or a service provider attempts to flush the unit but no water comes out after opening the drain valve, it is most likely blocked by sediment.
4. Leaking Drain Valve: The most obvious indication that you need to replace your drain valve is a leak coming from the drain valve.
How to check for a leak: Check to see if the drain valve is fully closed by using a slotted screw driver to tighten the closure; be sure to turn the closure to the right carefully, as you want to avoid opening the drain valve and draining the unit. If you confirm that the drain valve is fully closed and it continues to leak, your drain valve is leaking a needs to be replaced (Source: A.O. Smith).
Pro-tip: After fully drying the drip pan or floor near the drain valve’s suspected leak, place a cup or other receptacle beneath it. This way you can easily verify that the leak is coming from the end of the drain valve and avoid having to clean the water a second time.
What Causes a Leaky Drain Valve? A leak can be caused by corrosion or excess sediment build-up (especially when you have hard water). A leak can lead to water damage and even higher utility bills.
How to Replace a Drain Valve on a Water Heater
You may notice your water heater leaking from the drain valve at the bottom of the unit. When closed, the drain valve will keep water inside of the water tank. When open, the drain valve will flow out of the tank until the drain valve is closed or the tank becomes empty.
Over time, the drain valve may start to deteriorate to the point that it will need to be replaced. We will cover the steps involved in replacing a water heater drain valve in detail.
Note: Don’t try this at home unless you have the proper training.
Contact U.S. Water Heating Solutions to schedule a professional technician to replace your drain valve for you.
How to Replace a Water Heater Drain Valve
Source for Instructions: Rheem Drain Valve Packaging
Step One: Turn Off Power Source and/or Fuel Source to Water Heater
First, you will need to cut off power to the water heater. Your energy source will likely be electricity or gas (natural gas or LP).
To cut off electricity to your electric water heater, you’ll need to turn off power at the circuit breaker/electric panel. The circuit breaker should have a clear label to let you know which fuse corresponds with the water heater.
For a gas water heater, you’ll need to turn the
gas valve knob to the
PILOT position.
Step Two: Shut Off Water to Water Heater/Isolate Water Heater
Next, you will need to turn off the water supply to the water heater. You can turn off the water supply at the water heater itself using the shut off valve on the incoming or cold-water supply line.
The shut off valve prevents water from entering the water heater when closed. This allows you to work on your water heater without shutting off the water to the entire house.
(Most shut-off valves are ball valves. The best ball valves are easy to use, making ball valves a popular option compared to gate valves and other valves that require more effort to open and close)
Once complete, open a nearby hot water faucet and let the water run to relieve pressure. This process may take a few minutes and the water will eventually stop flowing; leave the hot water faucet on/open.
Step Three: Drain the Tank
Before you change out the drain valve, you will need to drain the water heater. Otherwise, the water heater will drain uncontrollably when you remove the drain valve from the unit.
In order to drain the water heater tank, attach a garden hose to the drain valve so that the loose end leads to a floor drain or another safe source; if there is not a nearby drain available, alternative options include running the hose outside (NOTE: it is important to check the area prior to running a hose outside to avoid water damage) or placing the hose into a bucket and closing the drain valve each time the bucket fills until you have emptied the water heater.
Once your hose is securely connected and the free end leads to a floor drain, you can open the drain valve to let the water inside of the hot water tank escape.
It is important to proceed with caution, as the water may still be hot.
Step Four: Remove the Old Drain Valve
With the tank empty, you can now remove the old drain valve from the hot water heater. In order to remove the old drain valve, you will need an adjustable wrench, pipe wrench, or similar tool. It is also recommended to bring a towel or rag to wipe up any excess water.
Grip the end of the drain valve attached to the water heater with the tool and turn counterclockwise to loosen it. After you get the drain valve loose, you should be able to continue loosening it with your hands until it separates from the water heater.
Any extra water remaining in the tank will escape at this time.
Step Five: Install New Drain Valve
Now, you will install the new drain valve.
In order to ensure that the drain valve doesn’t leak, we recommend using plumber’s tape (teflon tape) or another type of sealant over the threads. This will stop water from getting through the small grooves where the valve connects to the water heater. Next, you will screw the new drain valve to the appropriate location on the water heater, turning clockwise to tighten it.
Be sure to check that the drain valve has been tightened appropriately and that it is fully closed upon installation.
Step Six: Re-Fill Tank With Water
You will next restore water to the unit by opening the isolation valve on the cold supply. Water will fill the tank again, but it will not be warm yet.
You should periodically monitor the open faucet to ensure water is flowing and that the water is hot. This process should only take from 5 to 15 minutes, ensuring to remove or “bleed” all the air from your system. Shut off the faucet only after getting constant water flow, without air.
Step Seven: Restore Power/Fuel to the Unit
Now you will need to restore fuel to the water heater. You will do this by turning on the appropriate circuit breaker for your electric water heater or turning the gas valve to the appropriate position on the knob (typically this will be the “ON” position).
Once the power is restored to the unit, it will begin heating the water. The time it takes to heat up the water depends on the recovery time of the unit in question.
Step Eight: Check for Leaks
Now that you have successfully replaced you water heater’s drain valve, it is best to check that this new part is operating properly, without leaks. After letting the water heater refill partially, you can reconnect your hose (whose loose end should still be emptying into a drain) and open the drain valve.
As long as there are no leaks coming from the drain valve threads where it is installed in the water heater nor attached to the hose, you are all set! Remember to close the drain valve using a flathead screw driver or similar tool; be sure to check that the drain valve is fully closed.
Looking to Purchase a Drain Valve for your water heater?
Need a new drain valve for your water heater? U.S. Water Heating Solutions regularly stocks the following drain valves which can be purchased online or in person at our warehouse in Arlington Heights, IL. Our team of experienced water heater parts experts will also be happy to assist you in finding the drain valve that works for your water heater; please be sure to have your model and serial number available when contacting our parts department.
A.O. Smith / American / Reliance / State:
Bradford White:
Rheem / Richmond / Ruud:
- AP16800C | Round Poly Drain Valve
- AP16800E | Round Poly Drain Valve
- AP16800F | Round Poly Drain Valve
- SP12112G | Brass Drain Valve for Water Heater – Screwdriver, Brass, 2-1/4 in. Shank
- SP12112S | Brass Drain Valve for Water Heater – Screwdriver, Brass, 3 in. Shank
U.S. Water Heating Solutions
When you need water heater repair or other water heater service, you should contact the professionals at U.S. Water Heating Solutions to get the job done. We replace water heater drain valves. We even perform warranty repairs for many of the top manufacturers, including drain valves, as long as your unit is still covered under warranty.
Call our dispatch department at
1-833-879-4776 or
fill out our online form to get in touch with our team today!
You Might Also Like